Day 11: Apply Transfer Learning With VGG16 for a Simple Classification Task
Transfer learning is one of the most powerful techniques in deep learning, especially for computer vision tasks. With transfer learning, you leverage a pre-trained model (like VGG16) that has already learned features on a large dataset (such as ImageNet), and apply it to your own problem.
What is Transfer Learning?
Transfer Learning involves taking a pre-trained model, which has already been trained on a large dataset, and fine-tuning it to perform a new task. This is useful when you have limited data or want to leverage the knowledge captured by a powerful model.
VGG16 is a well-known pre-trained model from ImageNet that consists of 16 layers and is very effective at extracting useful features from images.
Overview of Today’s Task
- We will use the VGG16 model (pre-trained on ImageNet) and apply it to a new classification problem.
- You can choose a simple dataset, like Cats vs Dogs, or a small subset of CIFAR-10.
- We will freeze the convolutional base of VGG16 to use it as a feature extractor, then add custom fully connected layers on top for our classification task.
Dataset
Download the images from Google APIs Storage and save them to your desired location. We will refer to this location later in the code.
Step-by-Step Implementation
Step 1: Import Libraries and Load VGG16
First, we need to import the necessary libraries and load the pre-trained VGG16 model from Keras.
import tensorflow as tf
from tensorflow.keras.applications import VGG16
from tensorflow.keras.models import Sequential
from tensorflow.keras.layers import Dense, Flatten, Dropout
from tensorflow.keras.preprocessing.image import ImageDataGenerator
import matplotlib.pyplot as plt
Explanation:
- VGG16 is a popular deep learning model used for image classification. It’s pre-trained on ImageNet, containing millions of images across 1000 classes.
- We’ll use VGG16 as a feature extractor and add custom layers for our classification task.
Step 2: Load VGG16 Without the Top Layer
We’ll load the VGG16 model but exclude the top (fully connected) layers because we’ll be adding our own custom classification head.
# Load VGG16 without the top layer (fully connected layers)
vgg_base = VGG16(weights='imagenet', include_top=False, input_shape=(150, 150, 3))

# Freeze the convolutional base so that it's not trained again
vgg_base.trainable = False

# Summary of the VGG16 base model
vgg_base.summary()
Explanation:
- include_top=False: This excludes the fully connected layers at the top of the network; we only want the convolutional base.
- input_shape=(150, 150, 3): This is the shape of the input images. We resize the input to 150x150 pixels with 3 color channels (RGB).
- Freezing the base:
"vgg_base.trainable = False"freezes the convolutional base, so its weights are not updated during training. This way, we use the features VGG16 has already learned without retraining it from scratch.
Step 3: Add Custom Layers to the VGG16 Base
We will add some custom layers to the convolutional base of VGG16 for our specific task.
# Create a new model by adding custom layers to the VGG16 base
model = Sequential()

# Add the VGG16 base
model.add(vgg_base)

# Add a flattening layer to convert 3D output to 1D
model.add(Flatten())

# Add fully connected layer with dropout for regularization
model.add(Dense(256, activation='relu'))
model.add(Dropout(0.5))

# Add output layer with softmax for classification (2 classes in this case)
model.add(Dense(2, activation='softmax'))

# Compile the model
model.compile(optimizer='adam', loss='categorical_crossentropy', metrics=['accuracy'])

# Summary of the entire model
model.summary()
Explanation:
- Flatten Layer:
"Flatten()"converts the 3D output from the VGG16 base to 1D so that it can be used in fully connected layers. - Fully Connected Layer:
"Dense(256, activation='relu')"adds a fully connected layer with 256 neurons and ReLU activation."Dropout(0.5)"is used to prevent overfitting. - Output Layer:
"Dense(2, activation='softmax')"represents the output layer with 2 classes (e.g., cat vs. dog). Softmax is used for multi-class classification. - Compile the Model:
"Adam"optimizer is used to update weights, and categorical crossentropy is the loss function for classification.
Step 4: Set Up Data Augmentation Using ImageDataGenerator
Since we need to feed our model with images, we’ll use ImageDataGenerator to preprocess and augment the data.
# Set up data augmentation for training images
train_datagen = ImageDataGenerator(
    rescale=1./255,        # Normalize pixel values between 0 and 1
    rotation_range=15,     # Randomly rotate images by 15 degrees
    width_shift_range=0.1, # Randomly shift images horizontally
    height_shift_range=0.1,# Randomly shift images vertically
    zoom_range=0.1,        # Randomly zoom in images
    horizontal_flip=True   # Randomly flip images horizontally
)

# Only rescale the validation images
val_datagen = ImageDataGenerator(rescale=1./255)

# Load data using flow_from_directory (you need a directory of images)
train_generator = train_datagen.flow_from_directory(
    'path/to/train_data',  # Directory with training images
    target_size=(150, 150), # Resize all images to 150x150
    batch_size=32,
    class_mode='categorical' # Class mode for categorical labels
)

validation_generator = val_datagen.flow_from_directory(
    'path/to/validation_data',  # Directory with validation images
    target_size=(150, 150),
    batch_size=32,
    class_mode='categorical'
)
Explanation:
- ImageDataGenerator:
- Data Augmentation is applied to training images to increase variety.
- Validation images are only rescaled without augmentation for evaluation.
- flow_from_directory(): This function loads images from directories and applies transformations.
"target_size=(150, 150)"resizes images to 150x150, with batch size set to 32.
Step 5: Train the Model Using the Data Generators
Now that we have our model and data generators, we can train the model.
# Train the model
history = model.fit(
    train_generator,
    steps_per_epoch=train_generator.samples // train_generator.batch_size,
    validation_data=validation_generator,
    validation_steps=validation_generator.samples // validation_generator.batch_size,
    epochs=10,
    verbose=1
)
Explanation:
- Training the Model:
- steps_per_epoch: This is the number of batches to run per epoch, calculated by dividing the total number of samples by batch size.
- validation_steps: The number of validation batches to run.
- epochs=10: Train the model for 10 epochs.
Step 6: Evaluate and Visualize Training Performance
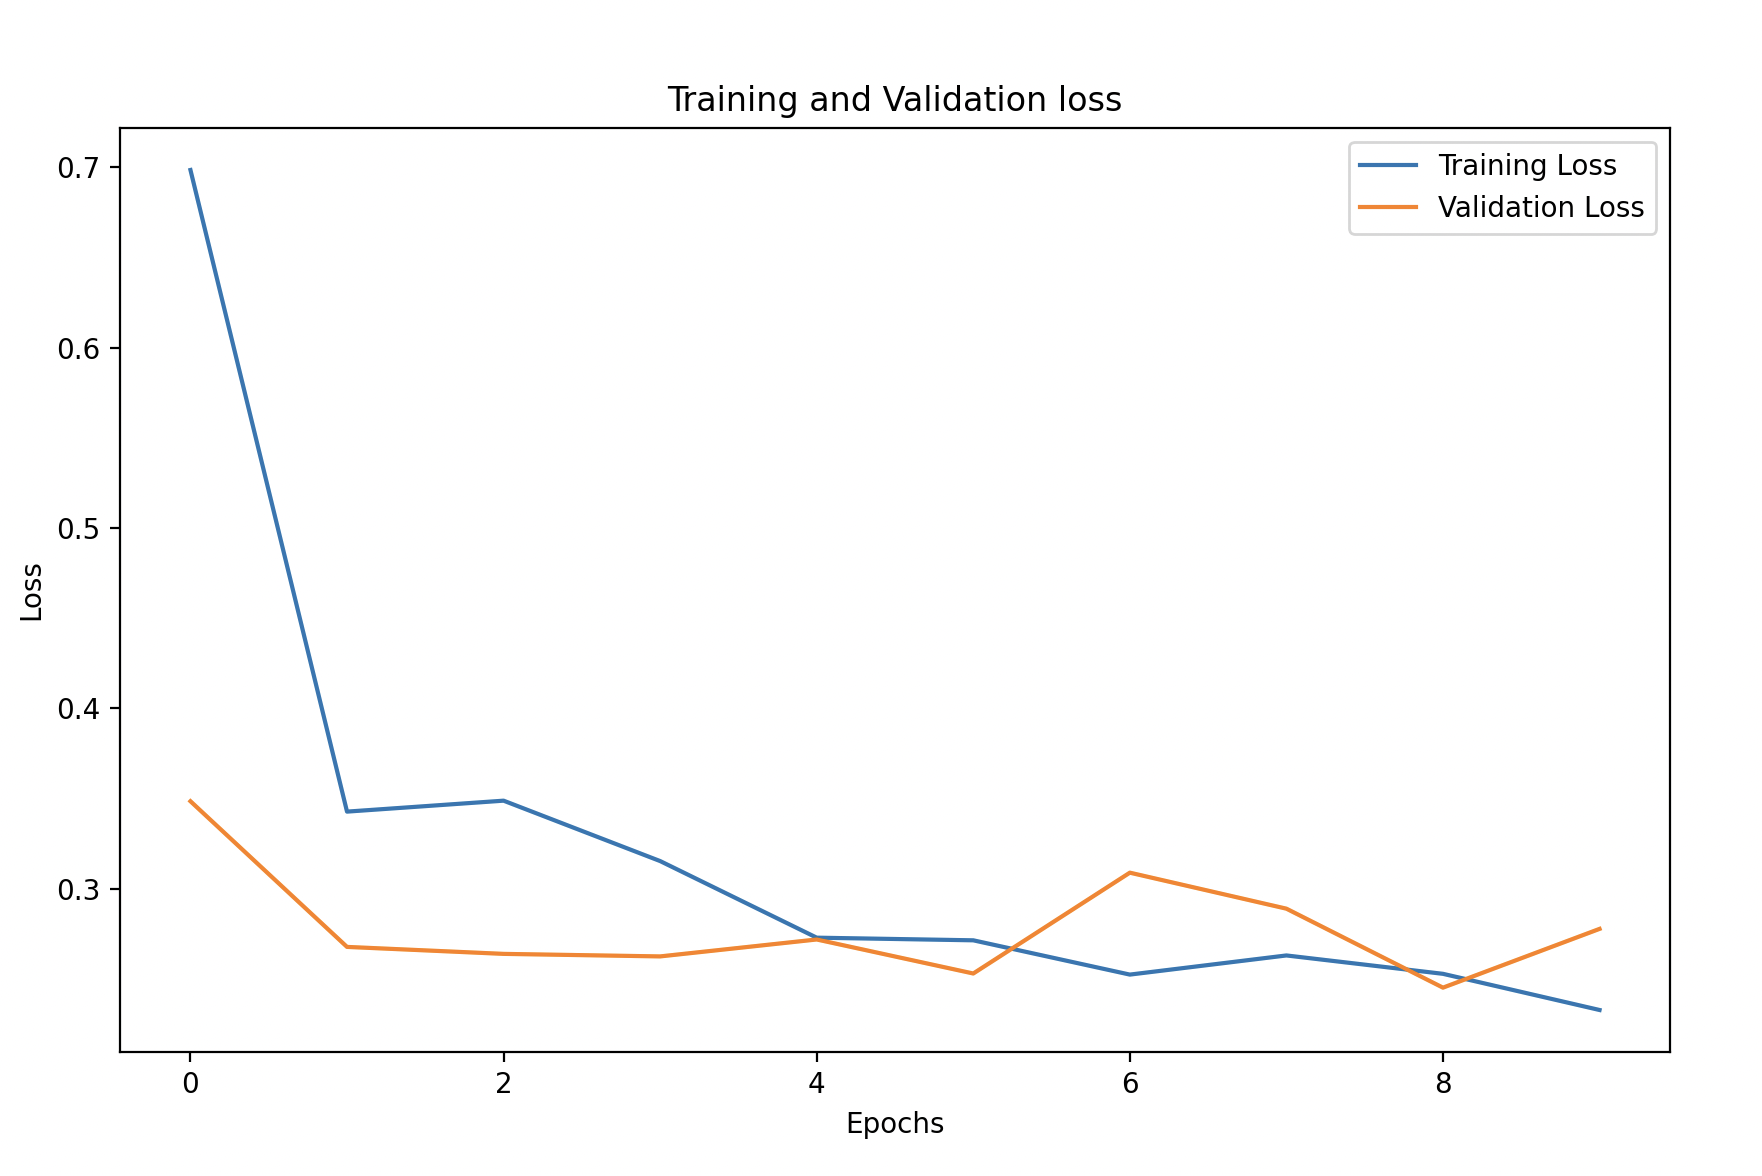
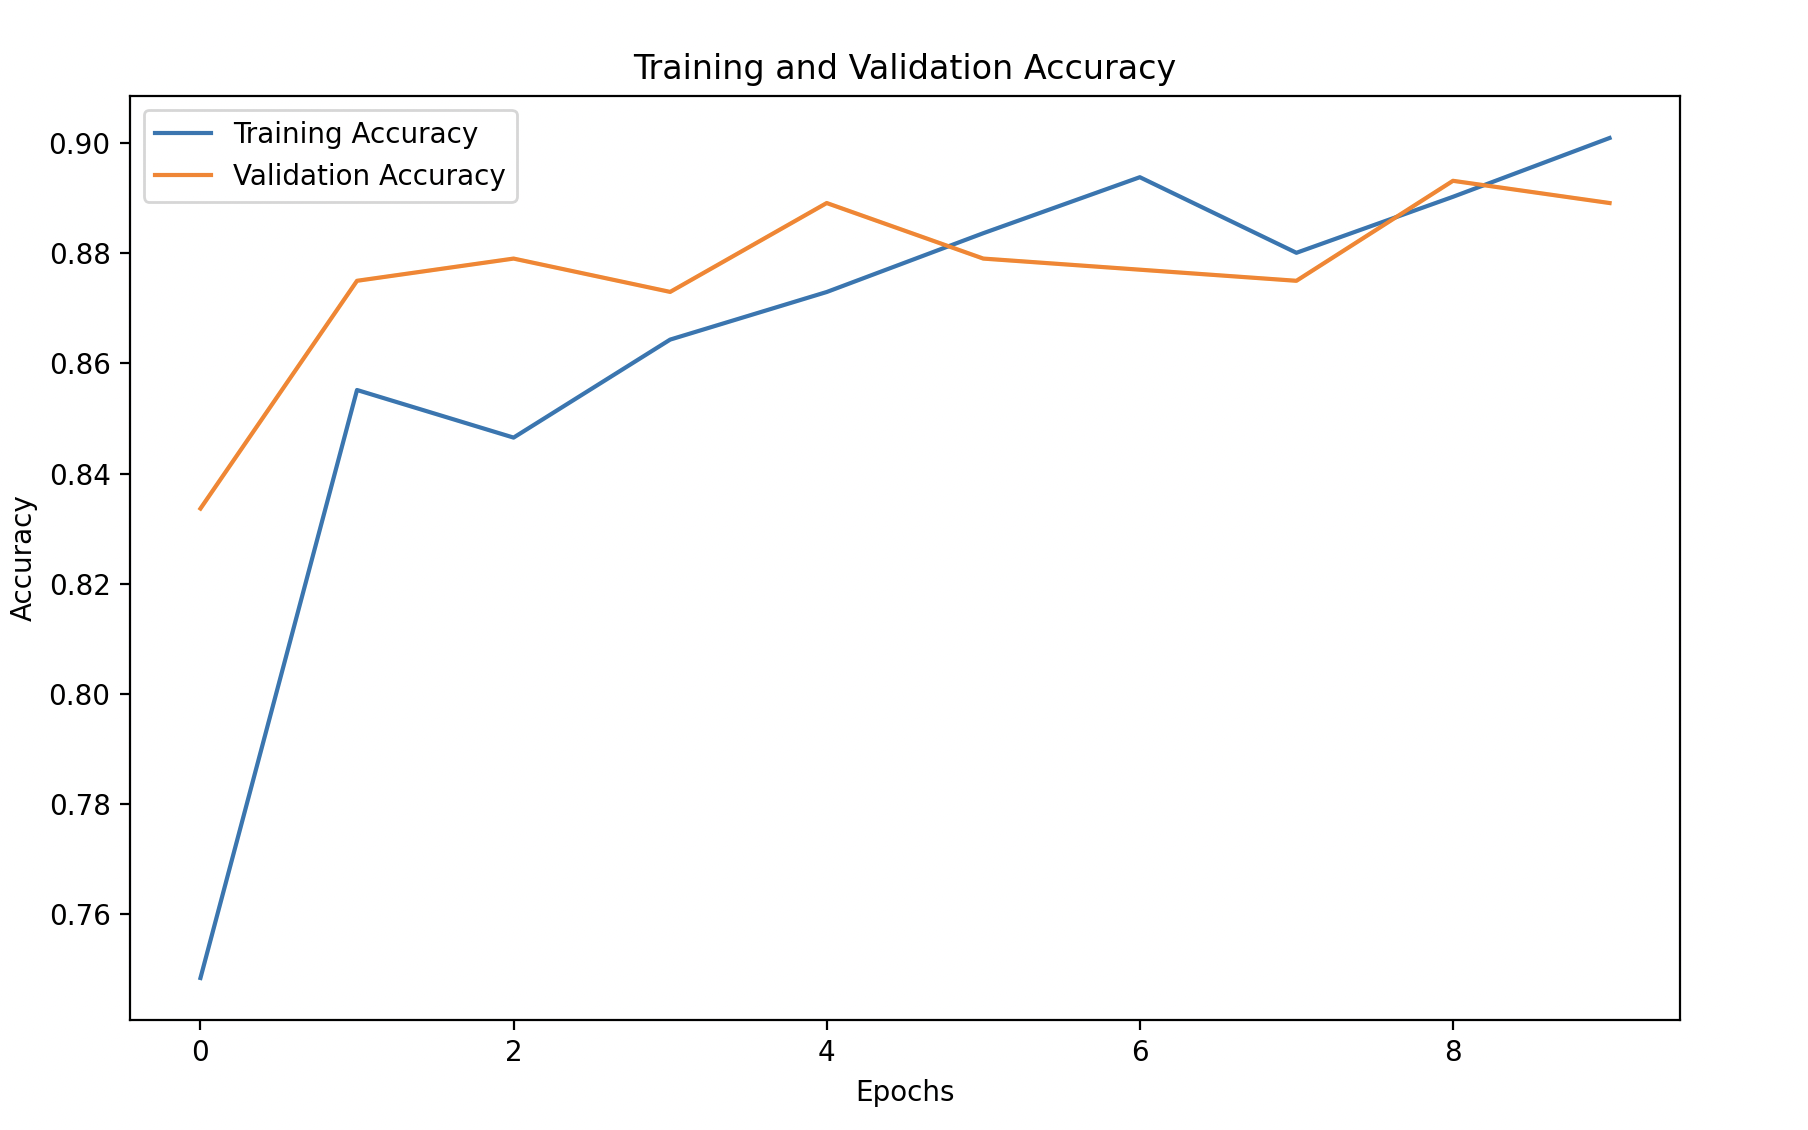
We can visualize the training history to understand the performance of our transfer learning model.
import pandas as pd

# Convert the history to a DataFrame for easy visualization
history_df = pd.DataFrame(history.history)

# Plot training and validation accuracy
plt.figure(figsize=(10, 6))
plt.plot(history_df['accuracy'], label='Training Accuracy')
plt.plot(history_df['val_accuracy'], linestyle='--', label='Validation Accuracy')
plt.xlabel('Epochs')
plt.ylabel('Accuracy')
plt.title('Training and Validation Accuracy')
plt.legend()
plt.show()

# Plot training and validation loss
plt.figure(figsize=(10, 6))
plt.plot(history_df['loss'], label='Training Loss')
plt.plot(history_df['val_loss'], linestyle='--', label='Validation Loss')
plt.xlabel('Epochs')
plt.ylabel('Loss')
plt.title('Training and Validation Loss')
plt.legend()
plt.show()
Explanation:
- Training vs Validation Accuracy/Loss: This helps visualize how well the model is performing during training. Ideally, training and validation accuracy should be close, indicating a well-generalized model.


Key Concepts About Transfer Learning with VGG16
Using Pre-trained Weights
- The VGG16 model is trained on ImageNet, a large dataset with millions of images. It has learned to detect useful features such as edges, textures, and object parts.
- Instead of starting from scratch, you leverage this knowledge and apply it to your dataset.
Feature Extraction
- By freezing the convolutional base, you use the pre-learned features for your new classification task.
- Adding new fully connected layers allows you to classify new categories based on these features.
Why Freeze the Layers?
- If your dataset is small, you may not have enough data to train the deep layers of the VGG16 model effectively.
- Freezing the layers prevents them from being updated, so they act as a feature extractor.
Expected Outcome
- You should see that the model quickly learns and achieves relatively high accuracy, even with a small number of epochs.
- This is because VGG16 already has learned useful features, and you’re simply fine-tuning it for your specific task.